
Page transitions help create a smoother, more connected experience by avoiding abrupt page changes and making navigation feel more continuous.
With Barba.js, we can intercept page navigation and load the next page in the background. This lets us replace content dynamically and animate the transition between the current page and the next one.
What We’re Building
In this tutorial, we’ll build a small page transition system with Barba.js, GSAP, and a few supporting utilities. We’ll start with a simple synced reveal, then gradually explore more expressive effects using WebGL, SVG morphing, overlay-based transitions, and animated pseudo-elements, all inspired by some truly epic sites.
The goal is not just to recreate a single animation, but to understand a flexible structure that can support different transition styles across a project built with Astro. By the end, you’ll have a reusable foundation for creating richer navigation experiences without reloading the entire page.
HTML Structure
We need to prepare a simple HTML structure that Barba.js can use to control page navigation. Instead of reloading the whole page, Barba.js only replaces a specific part of the layout when moving between pages. In this project, this structure is placed inside a base layout so it can be reused across all pages.
The data-barba="wrapper" attribute marks the element that wraps the entire page, while data-barba="container" defines the part that will change during navigation. The data-barba-namespace attribute gives each page a name, which can be useful later if we want to create different transitions for different pages. In this setup, the namespace value comes from a uid prop that is passed from each page to the layout.
Styling the Layout
After setting up the layout structure, we can add some basic styles for our main content wrapper. In this example, the .content class is used as the main wrapper for the content inside each page. It helps keep the layout consistent and centers the content on the screen.
.app__wrapper {
  background-color: var(--base-background);
  color: var(--base-text);
  height: 100svh;
}

.content__wrapper {
  width: 100%;
  min-height: 100svh;
  position: relative;
}

.content {
  min-height: 100svh;
  width: 100%;
  display: flex;
  align-items: center;
  justify-content: center;
}

.content .title {
  font-size: 15vw;
  text-transform: uppercase;
}
The .content element acts as a simple wrapper for the entire page content. It uses flexbox to center elements both vertically and horizontally, making it easier to position titles or sections in the middle of the screen. This keeps the layout simple while giving us a clean base before adding the page transitions.
Let’s start building our own custom transition.
Prerequisites & Helpers
Before we jump into the transitions, this project relies on a few small utilities and helper classes:
select()→ a simple helper function for querying DOM elementsMotionText→ a custom class used to animate split text (built with GSAP’s SplitText)vertexShaderandfragmentShader→ used for the WebGL transition effect- Utility functions like
hexToRgb
To keep this tutorial focused on page transitions, we won’t cover these in detail here. You can find their full implementation in the project source files.
JavaScript
class App {
  constructor() {
    this.motionTexts = new MotionText();
    this.motionTexts.init();
    this.motionTexts.animationIn();

    this.barbaWrapper = select("[data-barba='wrapper']");

    barba.init({
      transitions: [
        {
           // We will make custom transition inside here
        },
      ],
    });
  }
}

document.addEventListener("DOMContentLoaded", () => {
  gsap.registerPlugin(CustomEase, SplitText);

  CustomEase.create("hop", "0.56, 0, 0.35, 0.98");

  new App();
});
We’ll keep the transition logic inside an App class.
Inside the constructor, we create a property called barbaWrapper. This property selects the main wrapper element identified by data-barba="wrapper". This element is required by Barba.js as the main wrapper that wraps all page containers.
After that, we call barba.init() to initialize the page transition system and define where our custom transitions will be placed.
Outside the class, we listen for the DOMContentLoaded event. Once it fires, we first register the GSAP plugin CustomEase, then create a custom easing called "hop" that will be used later in our animations. Finally, we instantiate the App class to initialize the application.
Barba.js Concepts in This Project
Lifecycle

When a navigation happens, Barba.js runs several lifecycle hooks in a specific order, such as beforeLeave, leave, afterLeave, beforeEnter, enter, and afterEnter. Understanding this flow makes it easier to decide where our transition animation should start and end.
Rules
Rules define how Barba.js decides which transition should be used. Rules are divided into two types: keywords and conditions. In this project, we use condition rules to determine when a transition should run.
Sync Mode
Sync mode is one of the most powerful features in Barba.js. By default, the sync value is set to false, but we can change it depending on our needs. When sync is set to true, the leave and enter hooks run at the same time. This can create a smoother and more engaging experience for users.
It also allows us to animate both the current container and the next container together. For example, we can create a transition that looks like a sliding element using techniques such as clip-path or transform.
First Transition
This first transition is based on the one seen on https://cielrose.tv/ and we will name it default-transition. In this transition, we use several hooks: before, enter, and after from Barba.js.
We also enable sync mode in this transition to see how this feature works. With sync mode enabled, we can animate both containers at the same time, allowing us to animate both the current container and the next container together.
{
  name: "default-transition",
  before: () => {},
  enter: () => {},
  after: () => {},
  sync: true
}
before: (data) => {
this.barbaWrapper.classList.add("is__transitioning");
gsap.set(data.next.container, {
position: "fixed",
inset: 0,
scale: 0.6,
clipPath: "inset(100% 0 0 0)",
zIndex: 3,
willChange: "auto",
});
gsap.set(data.current.container, {
zIndex: 2,
willChange: "auto",
});
},In the before function, we define the initial state for both the current and next containers.
We also add an extra class called is__transitioning to the wrapper element (data-barba="wrapper"). This class disables interaction by applying pointer-events: none; to all anchor tags so users cannot trigger another navigation while a transition is still running. This prevents animations from overlapping during a transition in Barba.js.
enter: (data) => {
  const contentCurrent = data.current.container.querySelector(".content__wrapper");

  const tl = gsap.timeline({
    defaults: {
      duration: 1.25,
      ease: "power3.inOut",
    },
    onComplete: () => tl.kill(),
  });

  tl.to(data.current.container, {
    scale: 0.6,
  });

  tl.to(data.current.container, {
    opacity: 0.45,
    ease: "power3",
  });

  tl.to(
    contentCurrent,
    {
      yPercent: -10,
      ease: "power3"
    },
    "<",
  );

  tl.to(
    data.next.container,
    {
      clipPath: "inset(0% 0 0 0)",
      ease: "power3",
    },
    "<",
  );

  tl.to(data.next.container, {
    scale: 1,
    onStart: () => {
      this.motionTexts.destroy(); // Destroy motion text for the current container
      this.motionTexts.init(data.next.container); // Initialize motion text for the next container
      this.motionTexts.animationIn(); // Animate split text for next container
    },
  });

  return new Promise((resolve) => {
    tl.call(() => {
      resolve();
    });
  });
},
Now let’s implement the animation inside the enter function. Since sync mode is enabled, both the current and next containers are available simultaneously in the transition lifecycle. This allows us to animate them together inside a single GSAP timeline.
We select the .content__wrapper element inside the current container to add a small parallax effect while the next container moves from the bottom to the top using a clip-path animation.
after: (data) => {
  this.barbaWrapper.classList.remove("is__transitioning");

  gsap.set(data.next.container, {
    clearProps: "all",
  }); // Clear all inline GSAP styles to avoid conflicts with new animations
},
Finally, in the after function, we perform a small cleanup on the next container.
Here we remove all inline styles that were applied during the animation by using clearProps from GSAP.
We also remove the is__transitioning class from the wrapper so all anchor tags can be clicked again after the transition finishes in Barba.js.
Here is the preview for the first transition:
Second Transition
This next transition is based on https://www.faint-film.com/.
{
  name: "example-2-transition",
  to: {
    namespace: ["about"], // Condition's rule
  },
  before: () => {},
  leave: () => {},
  after: () => {},
}
We’ll name it example-2-transition. In this transition we use the to condition rule, which means the transition will run only when the next container has data-barba-namespace="about" in Barba.js.
For the concept of this second transition, we use a WebGL noise effect. A mesh will appear with a specific color, and the shader will reveal it using a noise pattern. Because of this noise function, the color appears in a random way across the surface, creating a more organic and dynamic transition effect.
Setting Up WebGL
To keep things organized, the WebGL logic is placed inside a class called WebGLPageTransition.
class WebGLPageTransition {
  constructor() {
    const rootStyle = getComputedStyle(document.documentElement);

    this.color = hexToRgb(rootStyle.getPropertyValue("--about-background"));

    this.dimension = {
      width: window.innerWidth,
      height: window.innerHeight,
      pixelRatio: Math.min(window.devicePixelRatio, 1),
    };

    this.cameraZ = 100;

    this.createScene();
    this.createCamera();
    this.createRenderer();
    this.createGeometry();
    this.createMesh();

    this.onResize();

    this.updateMeshSize();
  }

  createScene() {
    this.scene = new THREE.Scene();
  }

  createCamera() {
    const fov =
      2 * Math.atan(this.dimension.height / 2 / this.cameraZ) * (180 / Math.PI);
    this.camera = new THREE.PerspectiveCamera(
      fov,
      window.innerWidth / window.innerHeight,
      0.1,
      1000,
    );

    this.scene.add(this.camera);

    this.camera.position.z = this.cameraZ;
  }

  createRenderer() {
    this.renderer = new THREE.WebGLRenderer({
      alpha: true,
      antialias: true,
    });

    document.body.appendChild(this.renderer.domElement);

    this.renderer.domElement.id = "webgl";

    this.renderer.setSize(this.dimension.width, this.dimension.height);
    this.renderer.render(this.scene, this.camera);

    this.renderer.setPixelRatio(this.dimension.pixelRatio);
  }

  createGeometry() {
    this.geometry = new THREE.PlaneGeometry(1, 1);
  }

  onResize() {
    this.dimension.width = window.innerWidth;
    this.dimension.height = window.innerHeight;
    this.dimension.pixelRatio = Math.min(window.devicePixelRatio, 1);

    // Resize camera
    this.camera.aspect = this.dimension.width / this.dimension.height;
    this.camera.fov =
      2 * Math.atan(this.dimension.height / 2 / this.cameraZ) * (180 / Math.PI);
    this.camera.updateProjectionMatrix();

    // Resize renderer
    this.renderer.setSize(this.dimension.width, this.dimension.height);
    this.renderer.setPixelRatio(this.dimension.pixelRatio);

    this.updateMeshSize();
  }

  render() {
    this.renderer.render(this.scene, this.camera);
  }
}
The WebGLPageTransition class sets up the basic WebGL environment using Three.js. In the constructor, we read a color from the CSS variable --about-background and store the current viewport size and pixel ratio. These values are used to keep the WebGL canvas aligned with the browser window.
The methods createScene, createCamera, and createRenderer create the core WebGL setup. The scene acts as the main container for all objects, the camera defines how the scene is viewed, and the renderer creates the WebGL canvas that is appended to the document. A simple PlaneGeometry is also created, which will later be used as the surface for the shader transition.
The onResize method updates the camera and renderer whenever the window size changes so the canvas always matches the viewport. Finally, the render method draws the scene using the camera whenever the WebGL layer needs to be updated.
Creating the Mesh and Shader Material
createMesh() {
  this.material = new THREE.ShaderMaterial({
    uniforms: {
      uColor: {
        value: new THREE.Vector3(
          this.color.r / 255,
          this.color.g / 255,
          this.color.b / 255,
        ),
      },
      uProgress: {
        value: 1.5,
      },
    },
    vertexShader,
    fragmentShader,
    transparent: true,
  });

  this.mesh = new THREE.Mesh(this.geometry, this.material);

  this.scene.add(this.mesh);
}
Here we create a custom ShaderMaterial. The shader receives two uniforms:
uColor→ the background color used in the effectuProgress→ a value that will control the transition animation
The geometry and material are combined into a mesh, which is then added to the scene.
Below is the fragment shader used for the effect:
varying vec2 vUv;
uniform float uProgress;
uniform vec3 uColor;

// Resource noise function : https://gist.github.com/patriciogonzalezvivo/670c22f3966e662d2f83

float rand(vec2 n) {
	return fract(sin(dot(n, vec2(12.9898, 4.1414))) * 43758.5453);
}

float noise(vec2 p){
	vec2 ip = floor(p);
	vec2 u = fract(p);
	u = u*u*(3.0-2.0*u);

	float res = mix(
		mix(rand(ip),rand(ip+vec2(1.0,0.0)),u.x),
		mix(rand(ip+vec2(0.0,1.0)),rand(ip+vec2(1.0,1.0)),u.x),u.y);
	return res*res;
}

void main(){
  float noise = noise(vUv * 5.);

  float edge = 0.185;

  float disolve = smoothstep(1. - uProgress - edge, 1. - uProgress + edge, noise);

  float alpha = 1. - disolve;

  gl_FragColor = vec4(uColor, alpha);
}
This shader uses a noise function to create an irregular dissolve effect across the screen. The uProgress uniform controls how the dissolve spreads across the surface. As the value changes, the smoothstep function gradually reveals or hides parts of the plane based on the noise pattern. Finally, the shader outputs a color using uColor, while the computed alpha value controls the transparency. This creates a soft dissolve transition that we can animate later during the page transition.
Updating the Mesh Size
updateMeshSize() {
  this.mesh.scale.set(this.dimension.width, this.dimension.height, 1);
}
This method scales the plane so it always matches the size of the screen.
After creating the WebGLPageTransition class, we can initialize it inside the main App class. We also add a small render loop so the WebGL scene can continuously update.
Inside the constructor, we create a new instance of the WebGL class and start the render loop.
constructor() {
  this.barbaWrapper = select("[data-barba='wrapper']");

  this.webglPageTransition = new WebGLPageTransition();

  this.render();
  this.addEventListeners();

  barba.init({
    transitions: [
      {
      },
    ],
  });
}
Next, we add a few helper methods to control the WebGL instance.
onResize() {
  this.webglPageTransition.onResize();
}

addEventListeners() {
  window.addEventListener("resize", this.onResize.bind(this));
}

render() {
  this.webglPageTransition.render();
  requestAnimationFrame(this.render.bind(this));
}
The render() method creates a render loop using requestAnimationFrame. This continuously calls the WebGL render method so the scene can update every frame. The onResize() method simply forwards the resize event to the WebGL class so the renderer and camera can update when the window size changes.
Animating a WebGL Noise Transition
before: () => {
  this.barbaWrapper.classList.add("is__transitioning");
}
In the before function of this transition, we simply add the is__transitioning class to the wrapper element.
This class is used to temporarily disable interactions, such as clicking on links, while the transition is running in Barba.js.
leave: () => {
  const tl = gsap.timeline({
    defaults: {
      duration: 1,
      ease: "power1.in",
    },
    onComplete: () => tl.kill(),
  });

  gsap.set("#webgl", {
    pointerEvents: "auto",
    autoAlpha: 1,
    visibility: "visible",
  });

  tl.to(this.webglPageTransition.material.uniforms.uProgress, {
    value: -0.75,
  });

  return new Promise((resolve) => {
    tl.call(() => {
      this.motionTexts.destroy(); // Destroy motion text for the current container
      resolve();
    });
  });
},
Here we first make the WebGL canvas visible so the shader effect can appear above the page. Then we animate the uProgress uniform from the shader material. Since this value controls the dissolve effect in the shader, changing it creates the transition that covers the screen.
after: () => {
  const tl = gsap.timeline({
    defaults: {
      duration: 1,
      ease: "power1.in",
    },
    onComplete: () => {
      gsap.set("#webgl", {
        pointerEvents: "none",
        autoAlpha: 0,
        visibility: "hidden",
      });

      tl.kill();
    },
  });

  tl.to(this.webglPageTransition.material.uniforms.uProgress, {
    value: 1.5,
  });

  return new Promise((resolve) => {
    tl.call(() => {
      this.barbaWrapper.classList.remove("is__transitioning");
      resolve();
    });
  });
},
Here we animate the uProgress value back to 1.5, which hides the WebGL effect again. After the animation finishes, we hide the WebGL canvas.
Here the preview for the second transition:
Third Transition
For the third transition, we will create a smooth morphing animation on an SVG path using MorphSVGPlugin. It’s based this GSAP demo.
Before starting the animation, we first need to create an element that will be used for this effect using SVG.
Setting Up the SVG Morph Transition
The element
Element styles
.transition__morph__svg {
  position: fixed;
  top: 0;
  left: 0;
  width: 100%;
  height: 100dvh;
  pointer-events: none;
  z-index: 100;
  visibility: hidden;
}

.transition__morph__svg svg path {
  fill: var(--works-overlay);
  stroke: var(--works-overlay);
}
After creating the element for the SVG morph transition, we need to register the MorphSVGPlugin first.
import MorphSVGPlugin from "gsap/MorphSVGPlugin";

gsap.registerPlugin(SplitText, CustomEase, MorphSVGPlugin);
{
name: "example-3-transition",
to: {
namespace: ["works"],
},
before: () => {},
leave: () => {},
after: () => {},
}before: () => {
this.barbaWrapper.classList.add("is__transitioning");
},In the before function, we simply add the is__transitioning class to the wrapper to disable all anchor interactions during the transition.
leave: () => {
const tl = gsap.timeline({
defaults: {
duration: 1,
ease: "none",
},
onComplete: () => tl.kill(),
});
const path = select(".transition__morph__svg svg path");
gsap.set(".transition__morph__svg", {
pointerEvents: "auto",
autoAlpha: 1,
visibility: "visible",
});
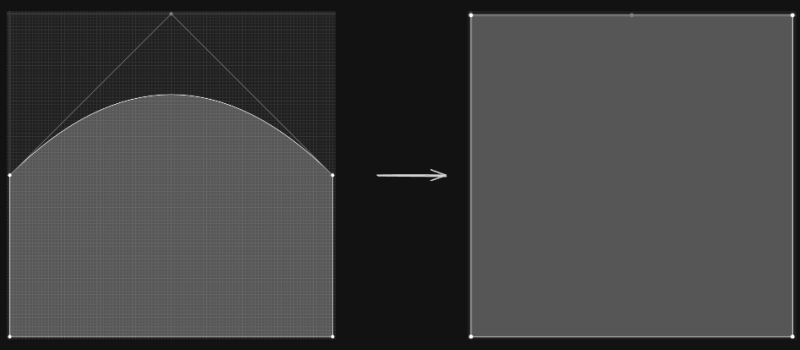
let enterCurve = 'M 0 100 V 50 Q 50 0 100 50 V 100 z',
filledPath = 'M 0 100 V 0 Q 50 0 100 0 V 100 z';
if (typeof data.trigger === "string") {
enterCurve = "M 0 0 V 50 Q 50 100 100 50 V 0 z";
filledPath = "M 0 0 V 100 Q 50 100 100 100 V 0 z";
gsap.set(path, {
attr: {
d: "M 0 0 V 0 Q 50 0 100 0 V 0 z",
},
});
}
tl.to(path, {
morphSVG: enterCurve,
});
tl.to(
path,
{
morphSVG: filledPath,
ease: "sine"
},
"<+=.5",
);
return new Promise((resolve) => {
tl.call(() => {
this.motionTexts.destroy(); // Destroy motion text for the current container
resolve();
});
});
},In the leave function, we run a MorphSVG animation using a single timeline from GSAP.
The morphSVG property changes the d attribute of the SVG path, making the shape transition smoothly. In this animation, the path first creates a curved shape moving upward, then expands until it fully covers the screen.
after: () => {
const path = select(".transition__morph__svg svg path");
const originalPath = path.dataset.originalPath;
const tl = gsap.timeline({
defaults: {
duration: 0.5,
ease: "sine.in",
},
onComplete: () => {
gsap.set(".transition__morph__svg", {
pointerEvents: "none",
autoAlpha: 0,
visibility: "hidden",
});
gsap.set(path, {
attr: { d: originalPath },
});
tl.kill();
},
});
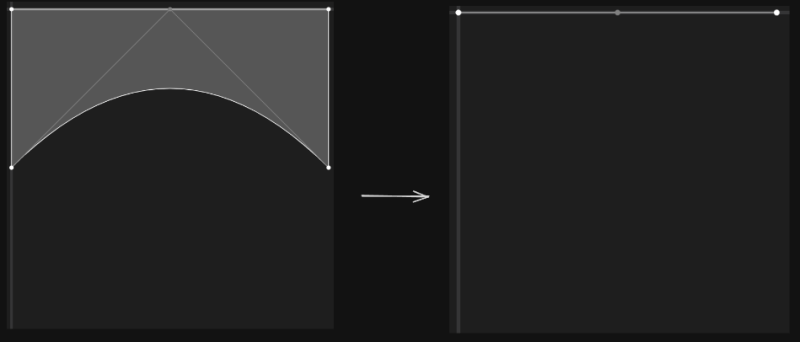
let leaveCurve = 'M 0 0 V 50 Q 50 0 100 50 V 0 z',
unfilledPath = 'M 0 0 V 0 Q 50 0 100 0 V 0 z';
if (typeof data.trigger === 'string') {
leaveCurve = 'M 0 100 V 50 Q 50 100 100 50 V 100 z';
unfilledPath = 'M 0 100 V 100 Q 50 100 100 100 V 100 z';
}
tl.to(path, {
morphSVG: leaveCurve,
});
tl.to(
path,
{
morphSVG: unfilledPath,
ease: "sine",
onStart: () => {
this.motionTexts.init(); // Initialize motion text for the next container
this.motionTexts.animationIn(); // Animate split text for next container
}
},
"<+=.5",
);
return new Promise((resolve) => {
tl.call(() => {
this.barbaWrapper.classList.remove("is__transitioning");
resolve();
});
});
},In the after function, we animate the path in the opposite direction.
The shape shrinks back from fullscreen into a curve, and finally returns to its initial state. After that, we reset the original d attribute, hide the SVG element, and remove the is__transitioning class so interactions are enabled again.
Here is the preview for the third transition:
Fourth Transition
This transition is based on https://bloomparis.tv/.
{
  name: "example-4-transition",
  to: {
    namespace: ["team"],
  },
  before: () => {},
  leave: () => {},
  after: () => {},
}
We will use an element called transition__overlay. This element is positioned fixed, fills the entire screen, and sits above the data-barba="container" elements used by Barba.js.
Inside this overlay, we place a title element that is positioned exactly in the center of the screen. This title will be used to display the destination page name and will also be animated during the transition.
Setting Up the Overlay Element
Overlay Element
Overlay Style
.transition__overlay {
  content: "";
  position: fixed;
  top: 0;
  left: 0;
  width: 100%;
  height: 100dvh;
  z-index: 100;
  will-change: clip-path;
  pointer-events: none;
  visibility: hidden;
}

.transition__overlay .title__destination {
  position: absolute;
  width: 100%;
  top: 50%;
  left: 0;
  transform: translateY(-50%);
  text-transform: uppercase;
  font-size: 5vw;
  color: var(--team-text);
  text-align: center;
  line-height: 1;
}
Constructor Setup
this.transitionOverlay = select(".transition__overlay");

this.titleDestination = select(".transition__overlay .title__destination");

this.splitTitleDestination = null;
Here we store references to the overlay and the title element.
transitionOverlay→ the main overlay element used in the transition.titleDestination→ the text that shows the destination page.splitTitleDestination→ initiallynull, later it will store the instance created by GSAPSplitTextso we can animate each word individually.
Calculate Clip Percentage
getPercentageVerticalClipExample3() {
  const titleDestinationBound = this.titleDestination.getBoundingClientRect();
  const halfHeightTitleDestination = titleDestinationBound.height / 2;
  const halfHeightViewport = window.innerHeight / 2;

  this.percentageVerticalClip =
    (halfHeightTitleDestination / halfHeightViewport) * 50;
}getBoundingClientRect()gets the size of the title element.- We calculate half of the title height.
- We also calculate half of the viewport height.
- Then we convert that value into a percentage relative to the viewport.
The result is stored in this.percentageVerticalClip. This value will later be used to control the clip-path animation so the transition initially opens exactly around the title area instead of the full screen.
before: (data) => {
  this.barbaWrapper.classList.add("is__transitioning");

  this.transitionOverlay.classList.add("team__transition");

  const nextDestination = data.next.url.path
    .split("/")
    .filter(Boolean)
    .pop();

  this.titleDestination.innerHTML = `we're going to ${nextDestination}`;

  if (this.splitTitleDestination) this.splitTitleDestination.revert();

  this.splitTitleDestination = new SplitText(this.titleDestination, {
    type: "words",
    mask: "words",
    wordsClass: "words",
  });

  gsap.set(this.transitionOverlay, {
    "--clip": `polygon(0% ${50 - this.percentageVerticalClip}%, 0% ${50 - this.percentageVerticalClip}%, 0% ${50 + this.percentageVerticalClip}%, 0% ${50 + this.percentageVerticalClip}%)`,
  });
},
In the before hook, we extract the destination page name from data.next.url.path. The code splits the URL into segments, removes empty values, and takes the last part of the path. This gives us the page name (for example "team").
That value is inserted into the title element so it displays:
we're going to teamAfter that, we create a new SplitText instance to split the title into words. This allows each word to be animated separately.
Finally, we set the initial clip-path value using a CSS variable. The overlay starts as a thin horizontal strip positioned around the title.
leave: () => {
  const tl = gsap.timeline({
    defaults: {
      duration: 1,
      ease: "expo.inOut",
    },
    onComplete: () => tl.kill(),
  });

  gsap.set(this.transitionOverlay, {
    pointerEvents: 'auto',
    autoAlpha: 1,
    visibility: 'visible',
  });

  tl.to(this.transitionOverlay, {
    '--clip': `polygon(0 ${50 - this.percentageVerticalClip}%, 100% ${50 - this.percentageVerticalClip}%, 100% ${50 + this.percentageVerticalClip}%, 0 ${50 + this.percentageVerticalClip}%)`,
  });

  tl.to(this.transitionOverlay, {
    "--clip": "polygon(0% 0%, 100% 0%, 100% 100%, 0% 100%)",
  });

  return new Promise((resolve) => {
    tl.call(() => {
      this.motionTexts.destroy(); // Destroy motion text for the current container
      resolve();
    });
  });
},
On the leave hook we make the overlay visible and enable pointer events so it can sit above the page.
Then we animate the CSS variable --clip which controls the clip-path of the overlay.
The animation happens in two steps:
- The thin horizontal strip expands across the full width of the screen.
- Then it grows vertically until it covers the entire viewport.
At this point the overlay fully covers the page, hiding the old content.
after: () => {
  const tl = gsap.timeline({
    defaults: {
      duration: 1,
      ease: "hop",
    },
    onComplete: () => {

      if (this.splitTitleDestination) {
        this.splitTitleDestination.revert();
        this.splitTitleDestination = null;
      }

      gsap.set(this.transitionOverlay, {
        pointerEvents: "none",
        autoAlpha: 0,
        visibility: "hidden",
      });

      tl.kill();
    },
  });

  tl.to(this.splitTitleDestination.words, {
    yPercent: -120,
    duration: 0.5,
    stagger: {
      amount: 0.25,
    },
    ease: "elastic.in(1, 1)",
  });

  tl.to(
    this.transitionOverlay,
    {
      "--clip": "polygon(0% 0%, 100% 0%, 100% 0%, 0% 0%)",
      onStart: () => {
         this.motionTexts.init(); // Initialize motion text for the next container
         this.motionTexts.animationIn(); // Animate split text for next container
      },
    },
    "<+0.25",
  );

  return new Promise((resolve) => {
    tl.call(() => {
      this.barbaWrapper.classList.remove("is__transitioning");
      this.transitionOverlay.classList.remove("team__transition");
      resolve();
    });
  });
},
Here, we animate the title words upward using a staggered animation. Each word moves up slightly one after another, creating a small motion effect.
At the same time, the overlay collapses back to the top using the clip-path animation, revealing the new page underneath.
When the animation finishes we:
- revert the SplitText instance to restore the original DOM structure
- hide the overlay again
Here is a preview for the fourth transition:
Note that in the demo, we’re just adding a simple text, but you can uncomment the line in the code where we actually get the name of the next page.
Fifth Transition
For the fifth transition we create a draw SVG animation inspired by the page transition seen on https://truus.co/.
Before starting the animation, we first need to create an element that will be used for this effect using SVG.
Setup transition draw svg element
The element
Styling element
.transition__svg__wrapper {
  position: fixed;
  inset: 0;
  overflow: hidden;
  z-index: 100;
  visibility: hidden;
  pointer-events: none;
  width: 100%;
  height: 100vh;
  will-change: visibility, pointer-events;
}

.svg__transition {
  width: 100%;
  height: 100%;
  display: grid;
  place-items: center;
}

.svg__transition svg {
  display: block;
  width: 125%;
  height: auto;
  aspect-ratio: 1;
}

.svg__transition svg path {
  stroke: var(--archive-overlay);
}
We make sure that the SVG is placed in the center and occupies all the width. Because of the shape of our path, we add a little extra width to make sure it fills all the area when we fill the stroke and draw it.
After creating the element for the draw SVG transition, we need to register the DrawSVGPlugin first.
import DrawSVGPlugin from "gsap/DrawSVGPlugin";

gsap.registerPlugin(SplitText, CustomEase, MorphSVGPlugin, DrawSVGPlugin);
{
name: "example-5-transition",
to: {
namespace: ["archive"],
},
before: () => {},
enter: () => {},
leave: () => {},
}before: () => {
this.barbaWrapper.classList.add("is__transitioning");
},In the before function, we simply add the is__transitioning class to the wrapper to disable all anchor interactions during the transition.
leave: () => {
  const tl = gsap.timeline({
    defaults: {
      duration: 1.4,
      ease: 'sine.inOut',
    },
    onComplete: () => tl.kill(),
  });

  gsap.set('.transition__svg__wrapper', {
    pointerEvents: 'auto',
    autoAlpha: 1,
    visibility: 'visible',
  });

  gsap.set('.svg__transition svg path', {
    drawSVG: '0% 0%',
    attr: { 'stroke-width': 100 },
    opacity: 0,
  });

  tl.to('.svg__transition svg path', {
    opacity: 1,
    duration: 0.5,
  });

  tl.to(
    '.svg__transition svg path',
    {
      drawSVG: '0% 100%',
    },
    '<',
  );

  tl.to(
    '.svg__transition svg path',
    {
      attr: { 'stroke-width': 400 },
      ease: 'sine.inOut',
    },
    '<+=0.18',
  );

  return new Promise((resolve) => {
    tl.call(() => {
      this.motionTexts.destroy();
      resolve();
    });
  });
},
Next, in the leave function, we animate several elements such as the SVG overlay and the SVG path using the DrawSVGPlugin. First, we set the initial state of the path using drawSVG: "0% 0%", which means the animation starts from the very beginning of the path. Then we animate it to drawSVG: "0% 100%", which draws the path from the start point to the end point. At the same time, we also animate the stroke-width of the path so it grows and eventually fills the entire screen.
after: () => {
  const tl = gsap.timeline({
    defaults: {
      duration: 1,
      ease: 'sine.inOut',
    },
    onComplete: () => {
      gsap.set('.transition__svg__wrapper', {
        pointerEvents: 'none',
        autoAlpha: 0,
        visibility: 'hidden',
      });

      gsap.set('.svg__transition svg path', {
        drawSVG: '0% 0%',
        attr: { 'stroke-width': 100 },
      });

      tl.kill();
    },
  });

  tl.to('.svg__transition svg path', {
    attr: { 'stroke-width': 100 },
  });

  tl.to(
    '.svg__transition svg path',
    {
      drawSVG: '100% 100%',
    },
    '<+=0.45',
  );

  return new Promise((resolve) => {
    tl.call(() => {
      this.barbaWrapper.classList.remove('is__transitioning');
      resolve();
    });
  });
},
Finally, in the after function, we animate the path using drawSVG: "100% 100%". This creates an effect where the path appears to erase itself from start to end. Along with that, we also animate the stroke-width back to its default value.
Here is the preview for our fifth transition:
Sixth Transition
This last transition is based on https://www.leandra-isler.ch/.
{
  name: "example-6-transition",
  to: {
    namespace: ["contact"],
  },
  before: () => {},
  enter: () => {},
  after: () => {},
  sync: true
}
Again, we use sync mode in Barba.js.
The concept is similar to the third transition because it also uses an overlay effect. However, instead of creating a separate overlay element, the overlay is created using a pseudo element from the next container.
The idea is to animate the clip-path of the next container so it expands into view. At the same time, we also animate the clip-path of the pseudo element. This makes it look like a curtain being lifted.
Styling the Pseudo-Element
.app__wrapper.contact__transition::before {
  content: "";
  position: absolute;
  top: 0;
  left: 0;
  width: 100%;
  height: 100%;
  z-index: 100;
  will-change: clip-path;
  background-color: var(--contact-overlay);
  clip-path: var(--clip, inset(0 0 100% 0));
}
before: (data) => {
this.barbaWrapper.classList.add("is__transitioning");
data.next.container.classList.add("contact__transition");
gsap.set(data.next.container, {
position: "fixed",
inset: 0,
zIndex: 3,
height: "100vh",
overflow: "hidden",
clipPath: "polygon(15% 75%, 85% 75%, 85% 75%, 15% 75%)",
"--clip": "inset(0 0 0% 0)",
});
},In the before function, we add an extra class to the next container called contact__transition. This class is used to control the styles of the pseudo element.
Inside gsap.set() we can also see a CSS variable called "--clip". This variable is used to control the clip-path of the pseudo element, so later we can animate the pseudo element using GSAP during the transition in Barba.js.
enter: (data) => {
  const tl = gsap.timeline({
    defaults: {
      duration: 1.25,
      ease: "hop",
    },
    onComplete: () => tl.kill(),
  });

  tl.to(data.next.container, {
    clipPath: "polygon(0% 100%, 100% 100%, 100% 0%, 0% 0%)",
  });

  tl.to(
    data.next.container,
    {
      "--clip": "inset(0 0 100% 0)",
    },
    "<+=0.285",
  );

 tl.call(() => {
   this.motionTexts.destroy(); // Destroy motion text for the current container
   this.motionTexts.init(data.next.container); // Initialize motion text for the next container
   this.motionTexts.animationIn(); // Animate split text for next container
  }, null, '<+=0.385');

  return new Promise((resolve) => {
    tl.call(() => {
      resolve();
    });
  });
},
Here we animate the next container using a GSAP timeline.
First we animate the clip-path polygon so the next container expands until it fills the entire screen.
Almost at the same time we also animate the CSS variable --clip. This variable controls the clip-path of the pseudo element inside the next container, creating an additional overlay animation.
after: (data) => {
  this.barbaWrapper.classList.remove('is__transitioning');

  data.next.container.classList.remove('contact__transition');

  gsap.set(data.next.container, {
    clearProps: 'all',
  }); // Clear all inline GSAP styles to avoid conflicts with new animations

}
After all animations finish, the after function performs a small cleanup.
Here we remove the inline styles from the next container using clearProps from GSAP. We also remove the extra class contact__transition that was previously added in the before hook.
Here the preview for our last transition:
Wrapping up
That’s the full setup for building page transitions in Astro with Barba.js and GSAP. By combining Astro’s component-driven structure with Barba’s routing layer and GSAP’s animation tools, you can create transitions that make navigation feel more deliberate and connected.
Now it’s your turn to experiment with what you’ve learned and start building page transitions that feel like your own.