

I’ve started using shaders as a powerful mechanism for creating cool generative art and building performant animations. One cool thing you can do with shaders is use the output from one as the input to another. Doing so can give you some really interesting and amazing effects.
In this article, I’ll walk you through how to do exactly that.
By following along with the article, you will:
- Get a project set up
- Create a simple shader
- Generate some Perlin noise
- Feed the output of the Perlin noise into an ASCII shader
- Add some control knobs to tweak the values in real time
By the end, you’ll have built this awesome looking shader:
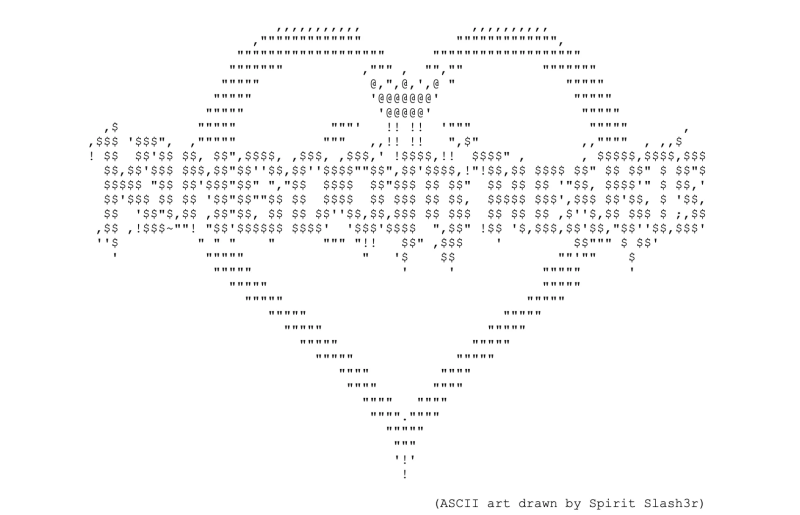
I’ve always liked ASCII art, and I think it stemmed from being a young gamer in the early 2000s. The fan-made walkthrough guides I used to use would often display the logo of the game using ASCII art, and I always loved it. So this article is a love letter to the unsung ASCII art heroes from the turn of the millennium.
Note: I’ll be using OGL to render the shader. If you haven’t used it before, it’s a lightweight alternative to Three.js. It’s not as feature-rich, but it can do a lot of cool shader + 3D work while being 1/5th of the size.
It’s worth having a little experience using shaders, to understand what they are, the differences between a vertex and fragment shader, etc. Since I’ll be creating the project from scratch, it’s recommended that you’re comfortable using the terminal in your preferred code editor of choice, and are comfortable writing basic HTML, CSS, JavaScript.
You can still follow along even if you haven’t had any experience, I’ll guide you step-by-step in creating the shader from scratch, focusing on building the project without diving too deeply into the fundamentals.
What we’ll be building
We’ll create two shaders. Instead of rendering the first shader to an HTML canvas (which is the default behaviour), we’ll store the rendered data in memory. Since it will be stored inside of a variable, we can then pass it to the second shader. The second shader will be able to
- We run the first shader, which generates Perlin noise.
- We store the output of this shader in memory as a texture
- We pass this texture to the second shader
- We run the second shader, which generates the ASCII characters
- As the second shader processes each pixel:
- It reads the corresponding pixel from the texture, the result of the first shader
- It reads the colour of that pixel
- It determines the correct ASCII character based on the amount of grey in that pixel
- The output of the second shader is rendered to web page
Step 0: Setting up a project
The setup required for this is relatively straight forward, so we’ll create the project from scratch.
Start by creating an empty directory and navigate into it. Run the following commands in your terminal:
npm init
npm i ogl resolve-lygia tweakpane vite
touch index.html
Open up your package.json file and update the scripts object:
"scripts": {
	"dev": "vite"
}
Finally kick off your dev server using npm run dev
Before opening the browser, you’ll need to paste the following into your index.html
Document
The above just adds the bare minimum markup to get something working. Finally create a new file main.mjs in the root directory and add a simple console.log("hello world").
Open the browser on the assigned port, open the console and you should see “hello world”
Step 1: Creating a simple shader
Before playing around with noise and ASCII generators, let’s write a simple shader. Doing so will lay the plumbing needed to add more complex shaders.
In the main.js file, import the following classes from OGL:
import {
	Camera,
	Mesh,
	Plane,
	Program,
	Renderer,
} from "ogl";
The first thing we’ll need to do to is initialise the render. Doing so creates a default canvas element, which we then append to page.
const renderer = new Renderer();
const gl = renderer.gl;
document.body.appendChild(gl.canvas);
The next step is to create a camera, which renders the scene as a human would see it. We need to pass through a couple of settings, like the boundaries of the view and the position of the camera.
const camera = new Camera(gl, { near: 0.1, far: 100 });
camera.position.set(0, 0, 3);
It’s also worth explicitly setting the width and height of the canvas. We’ll create a function that does this. We’ll then invoke it and attach it to the resize event listener.
function resize() {
	renderer.setSize(window.innerWidth, window.innerHeight);
	camera.perspective({ aspect: gl.canvas.width / gl.canvas.height });
}

window.addEventListener("resize", resize);
resize();
Let’s now create our very first shader. We’ll use OGL’s Program class, which is responsible for linking the vertex and fragment shaders. It’s also responsible for initialising uniform values, values we can dynamically update and pass through to our shader code.
Finally, and most importantly, it’s responsible for compiling our shader. If there’s a build-time error with the code, it will display warning in the console and not compile.
const program = new Program(gl, {
	vertex: `#version 300 es

in vec2 uv;
in vec2 position;

out vec2 vUv;

void main() {
  vUv = uv;
  gl_Position = vec4(position, 0.f, 1.f);
}`,
	fragment: `#version 300 es

precision mediump float;

uniform float uTime;

in vec2 vUv;

out vec4 fragColor;

void main() {
  float hue = sin(uTime) * 0.5f + 0.5f;

  vec3 color = vec3(hue, 0.0f, hue);

  fragColor = vec4(color, 1.0f);
}
`,
	uniforms: {
		uTime: { value: 0 },
	},
});
We’re passing through three options to our program, a vertex shader, a fragment shader, and the uniform values.
- The vertex shader is responsible for placing the position for each vertex of our shader.
- The fragment shader is responsible for assigning a color value to each pixel (aka fragment).
- The uniform object initialises the dynamic values we’ll pass through to our shader code. We can pass through new values every time we re-render the shader.
This shader won’t work just yet. If you look inside the fragment code, you may notice that the hue changes based on the current time. The hue value determines the amount of red and blue we’re adding to the pixel, since the color variable sets the RGB value for the fragment.
Now we next need to create a Plane geometry. This is going to be a 2D rectangle the covers the screen. To do this, we just need to pass through the following options:
const geometry = new Plane(gl, {
  width: 2,
  height: 2,
});
Now we need to combine the shader and the geometry program. This is achieved by using OGL’s Mesh class. Creating an instance of a mesh gives us a model that we can render to the screen.
const mesh = new Mesh(gl, { geometry, program });Now that we have everything we need to render our shader, we need to create a render loop which runs and renders the shader code on each frame. We also need to increase the elapsed time and update the uniform value. Without it, the sin function would return the same value on every frame.
function update(t) {
	requestAnimationFrame(update);

	const elapsedTime = t * 0.001;
	program.uniforms.uTime.value = elapsedTime;

	renderer.render({ scene: mesh, camera })
}
requestAnimationFrame(update);
If you open up you browser, you should see a shader that fluctuates between purple and black.
If your code isn’t rendering at all, or not as expected, go through the instructions a couple more times. OGL is also good at displaying compilation errors in the browser’s dev console, so it’s worth having it open and trying to understand exactly what’s going wrong.
The below shows a screenshot of a warning outputted by OGL when a statement in the shader cade doesn’t end with a semicolon.
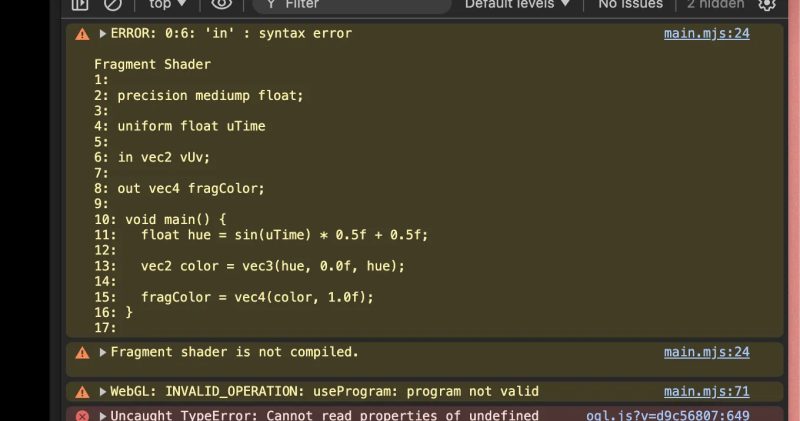
There are a few things to note here:
Fragment shader is not compiled– This indicates a build time issue, so there’s likely a problem with the syntax of your code, not a run time issueError: 0:6: 'in' : syntax error– This indicates an error on line 6. While line 6 itself is fine, you can see that line 4 hasn’t ended with a semi colon, which breaks the next line of code.
The error messages can be a little esoteric, so it may require a little investigating to resolve the problem you might come across. And it’s likely that you’ll come across some issues as there are LOTS of gotchas when it comes to writing shaders.
Aside: Common Gotchas
If you haven’t written shader code before, there’ll be a few things that’ll keep tripping you up.
I’d recommend installing the WebGL GLSL Editor extension to give you syntax highlighting for the GLSL files.
Since this isn’t a deep dive in to the GLSL language, I won’t spend too much time around the syntax, but there are things to be aware of:
- All statements need to end with a semi-colon. The program will crash otherwise.
- glsl is a strongly typed language, so you need to define the types of your variables. We’ll only be using
float,vec2,vec3, andvec4types in this article. - floats and integers are treated as different data types, so you need to provide a decimal point whenever you write a number.
OGL does a good job of displaying error messages in the console when there’s a compilation error. It’ll usually point you in the right direction if there’s a problem. In fact, here’s some broken GLSL. Replace it with your existing program variable and try and resolve the issues using the console to guide you:
const program = new Program(gl, {
	vertex: `#version 300 es

in vec2 uv;
in vec2 position;

out vec2 vUv;

void main() {
  vUv = uv;
  gl_Position = vec4(position, 0.f, 1.f);
}`,
	fragment: `#version 300 es

precision mediump float;

uniform float uTime

in vec2 vUv;

out vec4 fragColor;

void main() {
  float hue = sin(uTime) * 0.5f + 0.5f;

  vec2 color = vec3(hue, 0.0f, hue);

  fragColor = vec4(color, 1);
}
`,
	uniforms: {
		uTime: { value: 0 },
	},
});
Try your best to resolve all the errors in fragment using the console warnings, though I’ll provide the solutions in the line before:
uniform float uTimerequires a semi-color at the endvec2 color = vec3(hue, 0.0f, hue);has an incorrect type in the variable definition. It should be avec3not avec2.fragColor = vec4(color, 1)fails because1is an integer, not a float, which is the type that we’ve specified for variablefragColor
Step 2: Creating a Perlin Noise shader
Now that we’ve set up all the boilerplate to render a shader, let’s go ahead and convert our purple shader over to something more interesting:
We’ll start by creating files for our shaders and copying and pasting the inline code into these files.
Create a vertex.glsl file and cut/paste the inline vertex shader into this file
Create a fragment.glsl file and do the same.
Note: It’s important that the #version statements are on the very first line of the file, otherwise the browser won’t be able to compile the GLSL files.
Since Vite handles the importing of plain text file, we can go ahead and import the fragment and vertex shaders directly within our JS file:
import fragment from "./fragment.glsl?raw";
import vertex from "./vertex.glsl?raw";
Now update the Program constructor to reference these two imports
const program = new Program(gl, {
	vertex,
	fragment,
	uniforms: {
		uTime: { value: 0 },
	},
});
If everything’s been moved over correctly, the browser should still be rendering the purple shader.
What’s a Perlin noise algorithm?
Now that we’ve finished our set up, we’re going to create a more interesting shader. This one’s going to use a Perlin noise algorithm to generate natural feeling movements.
These kind of algorithms are commonly used when creating water effects, so it’s handy to have them in your shader toolbelt.
If you’re interested in learning more about Perlin noise, or noise algorithms in general. This Book of Shaders chapter is worth the read. Fun fact, Perlin noise was created by Ken Perlin to generate realistic textures using code, which he needed for the Disney movie Tron.
We’re also going to start passing through more uniform values.
const program = new Program(gl, {
	vertex,
	fragment,
	uniforms: {
		uTime: { value: 0 },
+		uFrequency: { value: 5.0 },
+		uBrightness: { value: 0.5 },
+		uSpeed: { value: 0.75 },
+		uValue: { value: 1 },
	},
});
Jump into the fragment.glsl file, delete everything inside of it, and paste in the following.
#version 300 es

precision mediump float;

uniform float uFrequency;
uniform float uTime;
uniform float uSpeed;
uniform float uValue;

in vec2 vUv;

out vec4 fragColor;

#include "lygia/generative/cnoise.glsl"

vec3 hsv2rgb(vec3 c) {
  vec4 K = vec4(1.0f, 2.0f / 3.0f, 1.0f / 3.0f, 3.0f);
  vec3 p = abs(fract(c.xxx + K.xyz) * 6.0f - K.www);
  return c.z * mix(K.xxx, clamp(p - K.xxx, 0.0f, 1.0f), c.y);
}

void main() {
  float hue = abs(cnoise(vec3(vUv * uFrequency, uTime * uSpeed)));

  vec3 rainbowColor = hsv2rgb(vec3(hue, 1.0f, uValue));

  fragColor = vec4(rainbowColor, 1.0f);
}
There’s a lot going on here, but I want to focus on two things
For starters, if you look at the main function you can see the following:
- We’re using a
cnoisefunction to generate the hue of the pixel. - We then convert the HSV into an RGB value. You don’t need to understand how this function works
- The RGB is painted to the screen
Secondly, we’re importing the cnoise function from a helper library called Lygia.
Our GLSL file doesn’t have access to the Lygia helpers by default so we need to make a couple of changes back in the main.mjs file. You need to import resolveLygia and wrap it around the shaders that need access to Lygia modules
import { resolveLygia } from "resolve-lygia";

// rest of code

const program = new Program(gl, {
	fragment: resolveLygia(fragment),
	// rest of options
});
With that completed, you should be able to see a shader that has a natural feeling animation.
It might not look and feel perfect, but later on we’ll integrate the mechanism that’ll allow you to easily tweak the various values.
Step 3: Feeding the noise shader as input to the ASCII shader
Now that we’ve created our first shader, let’s create an ASCII shader that replaces the pixels with an ascii character.
We’ll start by creating the boilerplate necessary for another shader.
Create a new file called ascii-vertex.glsl and paste the following code:
#version 300 es

in vec2 uv;
in vec2 position;

out vec2 vUv;

void main() {
  vUv = uv;
  gl_Position = vec4(position, 0., 1.);
}
You may have noticed that it’s exactly the same as the vertex.glsl file. This is common boilerplate if you don’t need to play around with any of the vertex positions.
Create another file called ascii-fragment.glsl and paste the following code:
#version 300 es

precision highp float;

uniform vec2 uResolution;
uniform sampler2D uTexture;

out vec4 fragColor;

float character(int n, vec2 p) {
  p = floor(p * vec2(-4.0f, 4.0f) + 2.5f);
  if(clamp(p.x, 0.0f, 4.0f) == p.x) {
    if(clamp(p.y, 0.0f, 4.0f) == p.y) {
      int a = int(round(p.x) + 5.0f * round(p.y));
      if(((n >> a) & 1) == 1)
        return 1.0f;
    }
  }
  return 0.0f;
}

void main() {
  vec2 pix = gl_FragCoord.xy;
  vec3 col = texture(uTexture, floor(pix / 16.0f) * 16.0f / uResolution.xy).rgb;

  float gray = 0.3f * col.r + 0.59f * col.g + 0.11f * col.b;

  int n = 4096;

  if(gray > 0.2f)
    n = 65600;    // :
  if(gray > 0.3f)
    n = 163153;   // *
  if(gray > 0.4f)
    n = 15255086; // o
  if(gray > 0.5f)
    n = 13121101; // &
  if(gray > 0.6f)
    n = 15252014; // 8
  if(gray > 0.7f)
    n = 13195790; // @
  if(gray > 0.8f)
    n = 11512810; // #

  vec2 p = mod(pix / 8.0f, 2.0f) - vec2(1.0f);
	col = col * character(n, p);
	fragColor = vec4(col, 1.0f);
}
Credit for the ASCII algorithm goes to the author of this shader in ShaderToy. I made a few tweaks to simplify it, but the core of it is the same.
As I mentioned at the top, it calculates the amount of grey in each 16×16 square and replaces it with an ascii character.
The texture function allows us to get the fragment color from the first shader. We’ll pass this through as a uniform value from within the JavaScript file. With this data, we can calculate the amount of grey used in that pixel, and render the corresponding ASCII character.
So let’s go ahead and set that up. The first step is to create a new program and a mesh for the ASCII shader. We’ll also reuse the existing geometry.
After that, you’ll need to make a few tweaks inside of the update function. You’ll need to pass through the screen size data, as the ASCII shader needs that information to calculate the dimensions. Finally, render it just like the other scene.
import asciiVertex from './ascii-vertex.glsl?raw';
import asciiFragment from './ascii-fragment.glsl?raw';

const asciiShaderProgram = new Program(gl, {
	vertex: asciiVertex,
	fragment: asciiFragment,
});

const asciiMesh = new Mesh(gl, { geometry, program: asciiShaderProgram });

// Rest of code
function update(t) {
	// existing rendering logic

	const width = gl.canvas.width;
	const height = gl.canvas.height;

	asciiShaderProgram.uniforms.uResolution = {
		value: [width, height],
	};

	renderer.render({ scene: asciiMesh, camera });
}
Nothing’s going to happen just yet, since we’re not passing through a texture to the ASCII shader, so the shader will error. The next step is to render the first shader and store the results in memory. Once we’ve done that, we can pass that data through to our ASCII shader. We can do this by creating an instance of a FrameBuffer, which is a class provided by OGL. The rendered data of our shader gets stored within the frame buffer.
import {
	// other imports
	RenderTarget,
} from "ogl";

// Renderer setup

const renderTarget = new RenderTarget(gl);

const asciiShaderProgram = new Program(gl, {
	vertex: asciiVertex,
	fragment: asciiFragment,
+	uniforms: {
+		uTexture: {
+			value: renderTarget.texture,
+		},
+	},
});

function update(t) {
	// existing code

-	renderer.render({ scene: mesh, camera });
+	renderer.render({ scene: mesh, camera, target: renderTarget });

	// existing code
}
Once that’s done, you’re ASCII shader should be working nicely.
Step 4: Playing around with the shader values
What’s particularly fun about creating shaders is endlessly tweaking the values to come up with really fun and interesting patterns.
You can manually tweak the values inside of the glsl files directly, but it’s much less hassle to use a control pane instead.
We’ll use Tweakpane for our control panel. Getting it set up is a breeze, just import the Pane class, create an instance of a pane, and then add bindings to the shader uniform values.
Remember those uniform values we passed through to the fragment shader earlier? Let’s bind those values to the control pane so we can tweak them in the browser:
import { Pane } from 'tweakpane';

// Just before the update loop
const pane = new Pane();

pane.addBinding(program.uniforms.uFrequency, "value", {
	min: 0,
	max: 10,
	label: "Frequency",
});

pane.addBinding(program.uniforms.uSpeed, "value", {
	min: 0,
	max: 2,
	label: "Speed",
});

pane.addBinding(program.uniforms.uValue, "value", {
	min: 0,
	max: 1,
	label: "Lightness",
});
Now you can play with the values and see everything update in real time.
Wrapping up
I hope you had some fun exploring shaders. Don’t sweat it if you find shaders a little confusing. I’ve found them to be incredibly humbling as a developer, and I’m still only scratching the surface of what they’re capable of.
By becoming more familiar with shaders, you’ll be able to create unique and performant animations for your web experiences.
Also, if you’re interested in learning more about web development, then consider checking out my course Component Odyssey. Component Odyssey will teach you everything you need to build and publish your very own component library. You’ll learn a ton that’ll serve you in your future frontend projects.